Controlling tomato diseases will require you to be proactive and apply preventive measures. That is because you cannot stop most tomato diseases after they affect the crop.
Even though there are fungicides and bactericides that can help combat these diseases, they are only truly effective when you apply them as preventive measures.
For organic farmers, there are products such as copper sulfate, which are naturally derived but are still highly toxic. This type of product is only allowed to be used in extreme cases.
In such a case, the organic farmers must report that no other measures have been effective and they are in danger of significant economic losses if the disease were to progress.
Some home made remedies for controlling tomato diseases range from the use of hydrogen peroxide and baking soda sprays to applying a slurry of skim milk or just feeding the plants chamomile tea.
While there may be merit to some of these approaches, waging war with tomato diseases is rarely a winning battle, making prevention techniques the best cure.
In order to properly care for the tomatoes, here are a few things you can do.
1. Minimize frequent irrigation of your tomato farm Tomato plants have surprisingly low water needs and overwatering can promote diseases. Once the fruit has started to form, water only when the top three inches of soil becomes dry and the leaves look limp in the heat of the day.
2. Water the tomato crop at ground level Little can be done about water that falls from the sky, but don’t add insult to injury by showering your tomatoes with a sprinkler. Irrigating your tomato farm with a sprinkler will only increase the spread of fungal diseases that thrive when the plants are wet. Instead, use drip irrigation or a soaker hose to apply water directly to the roots of the plant.
3. Water the tomatoes plants in the morning By watering in the morning, you allow the moisture to evaporate quickly from the surface of soil. This will provide the roots the water they need, but keep the humidity down around the plants.
4. Use straw or dried leaves to mulch your tomatoes Mulching helps by covering the fungal spores in the soil. It also helps to conserve moisture in the soil, so you don’t have to water as much.
5. Remove disease infected leaves from the tomatoes farm immediately When you notice any spots or deformation on the leaves of the tomato plants, don’t hesitate to clip them off. Doing this early may save the rest of the plant from succumbing to the disease. After clipping the affected leaves, dispose them far away from your tomato plants.
6. Prune out dense foliage from the tomato stem Tomatoes tend to grow more thickly than is necessary, reducing air flow and producing more foliage than their immune systems can support. To reduce this, prune out new sprouts that emerge from the main stems. Do this once fruit has begun to develop and then train the plants to an open, spreading form.
7. Weed out all vegetation and make sure every other crop is low Ideally, tomatoes should be planted out in the open with nothing but mulch, turf grass or other small stature crops (like basil or garlic) around them. That’s because tomatoes need a lot of airflow to grow effectively. Thicket of weeds or a tall patch of corn or beans next to your tomatoes blocks airflow and keeps the humidity high at ground level.
8. Disinfect all tools used in the tomato farm Maintain proper hygiene by disinfecting every tool you use on the farm. After pruning diseased tomato plants or after working on the soil around them, you should disinfect the tools before using on or around healthy tomato plants.
Also, be careful not to repeat the same tools on plants in the tomato family, such as peppers, potatoes and eggplant. To disinfect your pruning shears, dip the tools in a 10 percent bleach solution or full-strength rubbing alcohol.
9. Control insect pests from affecting the tomatoes It is rare for tomatoes to be destroyed by insects, but they are frequently attacked on a small scale. These attacks weakens the plants and makes them more susceptible to disease. Typically, some of these insects are also vectors which are responsible for spreading diseases.
To disperse small sucking insects like scale, aphids and mites, spray an all-natural insecticidal soap on the plant. As for larger bugs like hornworms and stink bugs, you can pick them off by hand.
Always, check the stems and both sides of the leaves if you see signs of insect damage. Follow the signs with immediate remedial actions if necessary.
10. Fertilize the tomato crop Tomatoes are heavy feeders and will have greater disease resistance with a few boosts of fertilizer during the growing season. Once the fruit has set, apply a high phosphorus fertilizer every three weeks.
In part 1 of the Tomato Farming in 2021 [How to grow tomatoes step by step] we had looked at step 1 in Tomato Farming and other important things to note about Tomato.
This is a continuation from where we stopped.
Step 2: Transplant the tomato plants to the farm
After preparing your tomato seedlings in the nursery, now it is time to transplant them outdoors.
But one problem that you may have is that the conditions outside the nursery are harsh.
Everything from the desiccating winds, to the heat of the sun, and armies of bugs and diseases can destroy your young tomato plants.
To prevent this from happening, there are two things you must do before going about transplanting the tomato seedlings in the outdoors.
The first thing to do is what farmers call “hardening off” while the other one is “land preparation.”
Hardening off tomato seedlings
The term “hardening off” tomato seedlings describes the gradual introduction of the seedlings to the outdoors.
This should typically happen over a 10-day period.
The essence of this process is to acclimate the tomato seedlings to outdoor conditions.
It is a gradual process and will require plenty of patience and hand-holding.
Here are the steps to follow for hardening off tomato seedlings;
You need a place with shelter outside where the seedlings can sit in filtered sunlight and out of the wind. One option is to string a shade cloth overhead and on the side wind blows from.
The next step is to take your tomato seedlings outside and leave them in this shelter for a few hours on the first day. After day one, bring back the tomato seedlings inside. On day two, leave them outdoors for a little longer than the previous day. Continue taking them back and forth each day, leaving them out a little longer each time and slowly increasing their sun exposure by taking them out of the shade gradually. After five or six days of going back and forth, leave the seedlings out overnight for the remaining four or five days. While doing this, keep an eye on the weather and bring them in if there is any danger of heavy rain or frost.
Site selection and soil preparation for tomato farming
When it comes to site selection for tomatoes farming, select a site with full sun.
This is because the warmer the soil is the faster the tomatoes will grow.
So, ensure that your tomato farm receives at least 6 hours of daily sunlight.
As for the suitable soil type for growing tomatoes, tomatoes will grow in many different soil types.
However, the soil needs to be well-drained and not waterlogged.
Waterlogging will prevent the soil from warming up quickly especially in rainy season and then affect the tomato growth.
In addition, ensure that the soil for growing the tomatoes is slightly acidic with a pH of 6.2 to 6.8.
While you are still hardening off the tomato plants, you can as well start preparing the soil from day one.
Here’s how to prepare the soil for growing tomatoes;
Loosen the soil to a depth of at least 8 inches. How you loosen the soil will depend on the size of the tomato farm. You can use a digging fork or a rototiller for a small garden while a large tomato farm will need a tractor.
While tilling, incorporate and thoroughly mix compost into the soil. After that, create a low mound with the loose soil. The mound should be about 4 feet wide. If you are going to use a drip irrigation system, now is the time to lay the drip tapes. Finally, it’s time to transplant the tomato seedlings.
Tomato Seedlings Transplant
How to transplant tomato seedlings
After selecting the best site and completing the land preparation process, transplant the tomato seedlings to the land.
Ensure that the seedlings are mature enough for transplanting.
You will know that your tomatoes are ready for transplanting into the garden when the seedlings are 3 to 4 inches tall.
Also, ensure that the nighttime temperatures are consistently above 50 degrees.
With all of these in check, here’s how to transplant tomato seedlings to the garden.
Dig a hole in the middle of your tomato bed that is at least a few inches deeper than the depth of the pot the seedlings are in. If you are using a drip irrigation system, make sure the hole is close to the water nipple. As for the spacing, check the seed package for the recommended spacing between tomato seedlings for each variety you are planting. Spacing is based on the mature size of the plant and may range from 30 to 60 inches. Avoid overcrowding the tomato plant stands as this will lead to the spread of diseases.
Next step is to remove each seedling from its container and loosen the roots very gently. After that, plant the seedlings deep and leave only the topmost leaves above the ground. This technique helps the tomatoes to improve drought tolerance, root establishment and wind resistance.
Finally, press the soil firmly around the seedlings with your hands and then give them their first watering.
Tips for growing tomatoes successfully
While growing tomatoes may be very easy to do, many things can go wrong in the short life of a tomato plant.
To prevent them from happening, take a few extra steps to give your seedlings the best chance for success.
The following tips will help you to become successful in tomato farming;
1. Ensure that the soil condition for planting tomatoes is slightly acidic.
The ideal pH for growing tomatoes is between 6 and 6.8.
To be sure of the soil pH level, you can test your soil pH with a kit available at most farming centers/local extension service.
If the soil is too acidic soil then you can adjust it by adding lime.
On the other hand, you can amend an alkaline soil by adding sulfur to lower the pH.
Note that it will takes a few months for the pH of the soil to adjust.
Because of that, ensure that you do these amendments months before planting time.
2. Avoid planting tomatoes on the same piece of land every year.
This is common practice with most other crops.
Soil borne pathogens and diseases remain in the soil after harvesting the tomatoes.
Therefore, planting on the same land piece of land will expose the plant to these pathogens
As a result, you will experience losses and low yield in your tomato farm.
The best way to prevent this from happening is by planting on a different portion of land every year.
3. Keep the soil warm by covering it with a black plastic
After preparing beds for tomatoes, covering the soil with black plastic for a few weeks prior to planting is one way to get it warm.
Besides getting it warm, the plastic traps enough heat to kill insect larvae and diseases in the soil.
In cool climates with a short growing season, you can leave the plastic for the first few weeks after planting, putting the seedlings in the ground via a small slit.
The black plastic sheet will absorb the heat of the sun and transfer it to the soil.
As a result it helps to maintain temperatures above 60⁰F which the tomato plants love.
4. Use a healthy dressing of compost at planting time for the tomatoes
While it is important to incorporate compost into the soil during land preparation, it is also necessary to dress the tomato plant with a healthy amount of compost.
Also, adding some fertilizer ensures the plants get off to a strong start.
One method of adding fertilizer is by digging a trench down the middle of the bed.
The trench should be a couple of inches below the depth where the roots will be planted.
Once the digging is completed, spread a band of fertilizer for the tomatoes to grow into.
For the purpose of root establishment, use a bone meal-based fertilizer, which is high in phosphorus.
A few weeks after planting, apply a fertilizer with a higher nitrogen content on the surface of the beds to support lush vegetative growth.
5. Water your tomato seedlings
In a situation where heat is too much and water evaporates easily, you may need to water tomatoes daily.
Water the tomatoes whenever the soil dries out an inch or two below the surface.
After three or four weeks of growth, mulch the beds with a thick layer of straw to conserve moisture and keep the weeds down.
More steps will be published in our subsequent articles.
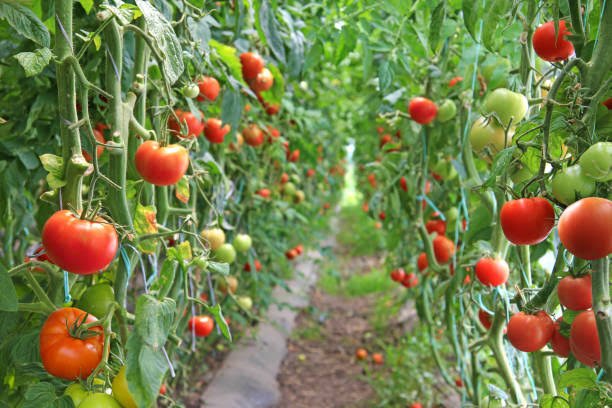
If you have an interest in learning how to grow tomatoes commercially, indoors, in pots or containers, then read this tomato farming guide till the end.
This guide on how to grow tomatoes covers everything starting from planting tomato seeds through to harvesting.
Tomatoes are very productive and have many uses in the kitchen and you can as well eat them fresh off the vine.
It is a very popular vegetable all over the world which people use in making different types of dishes including stews, soups, salads, burger, jollof rice etc.
They are also used in the production of tomato paste, puree, ketchup, tomato juice and lots of other dishes and sauces.
The interesting fact about tomatoes is that it is easy to grow, requiring little or no expertise at all.
All you need is the basic techniques for growing tomatoes and you will become successful in tomato farming
This guide covers all the information you need to grow tomatoes successfully—including;
Selecting the best tomato varieties Preparing the seeds Transplanting tomatoes outside Staking the tomato vines Finally, tips on how to care for the tomato plant. You can as well use the table of content in this article to navigate your way through this tomato farming guide.
Tomato Farm
What are the basic necessities for starting a tomato farm?
To start your tomato farm, here are the basic things that must be in place;
Firstly, you need viable tomato seeds. There are many varieties of tomato and we’ll discuss some of them later in this article. You must also have a nursery for sprouting the tomato seeds Then, you need a fertile land for transplanting the tomato plants Finally, you must have a disease and pest prevention control measures
How long does it take tomatoes to grow?
How much time it takes for tomatoes to grow to maturity will depend on the variety of the tomato.
For instance, you can plant a quick growing tomato such as the 4th of July Tomato, and you’ll be eating your first ripe tomato in as little as 49 days after transplanting.
However, the number of days to maturity of tomatoes ranges anywhere from 60 days to more than 80 days.
Because of the relatively long period of time it takes for tomatoes to grow, most farmers grow them by transplanting rather than planting the seeds directly into the garden.
It’s also common to purchase transplants in garden nurseries which you can plant in your garden.
When picking tomato transplants, look for short, stocky plants with dark green color and straight, sturdy stems about the size of a pencil or thicker.
Try not to pick plants with yellowing leaves, spots, or stress damage.
Also, avoid plants with flowers or fruits already in progress.
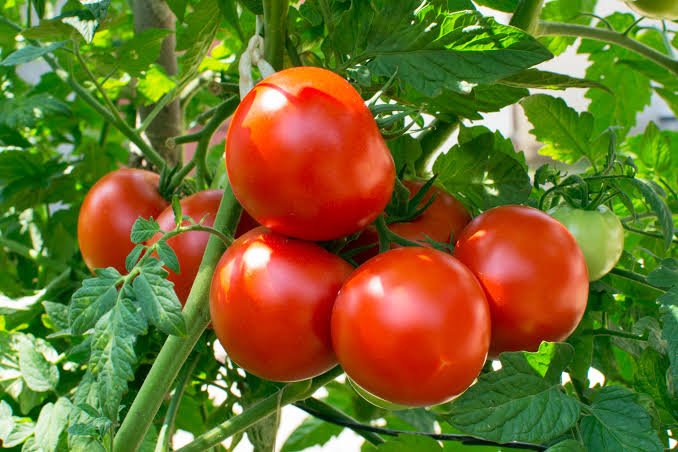
Tomato Seedlings
Tomato farming guide: How to grow tomatoes step by step
Growing tomatoes is not difficult at all you need to ensure that certain conditions are in place to support the growth of the plant.
You must ensure that the time of planting is right and that you are using the right variety of tomato seeds.
Following these precautions will guarantee success in your tomato farming business and ensure great yields.
There are lots of conversations within each of the steps in this tomato farming guide.
So, you must take your time to read between the lines to get all the information you need for a profitable tomato farming business.
Without further ado, let’s get right into this tomato farming guide.
Step 1: Prepare the tomato nursery
The very first step of the tomato farming process is to prepare the nursery for sprouting the tomato seeds.
Most farmers may choose to prepare their tomato nursery on raised beds in their garden, however, you can start your seeds indoors.
So, whether you have a greenhouse or a sunny window ledge, that will suffice for making the tomato nursery.
Once the seeds start sprouting and have a few leaves and an established root system, you can then transplant it to an area that provides room for growth and tomato production.
Tomato Nursery
How to prepare tomato nursery
While starting seeds indoors may be optional with many vegetables, it is very important in tomato farming.
That’s because tomato seeds need a constant soil temperature of at least 60oF, and preferably 80oF, to germinate.
Tomatoes originate deep in the tropics, as a result, any temperature below 32 degrees Fahrenheit will kill it.
If you have a garden or a small space in your backyard, you can also use it to start your tomato nursery.
This can be done around March/April when the rain is just starting in most parts of the country
Although, with the change in climate, you need to check with any farming calendar to find the best time for every year for growing tomatoes.
If you don’t have a small piece of land for the tomato nursery another option is to use pots or containers.
Using pots or containers to grow tomato seeds may require you to get soilless potting mix or seeding mix.
A soilless potting mix is a standard homemade soilless mix containing equal amounts of peat moss, perlite (and/or vermiculite), and sand.
In the absence of sand, wood bark replaces sand while coconut coir replaces peat moss.
This medium is great for sowing tomato seeds, though you can opt for the more expensive ‘seeding mix’ if you want.
If you are using containers, make use of the tiny plastic pots grouped together in packs often used for flower and veggie seedlings to start the tomato seeds.
However, a better idea is to use a small pot at least 3 or 4 inches tall and wide so the seedlings can grow to a healthy size without their roots being constricted.
How to use the potting mix for tomato nursery farm
The steps for using the potting mix for a tomato nursery includes the following
The first step is to fill the pots with potting mix leaving a space of about 1/2-inch at the top of each pot. Next step is to place a pair of tomato seeds on top of the soil in each one near the center of the pot. Having two seedlings provides insurance in case one doesn’t sprout. In a situation where they both sprout, pinch off the smaller or weaker of the two plants. After placing the tomato seeds in all the pots, cover them with about ¼-inch layers of soil mix and then compress the soil with your fingers. Compressing the soil with your fingers creates good seed-to-soil contact which is important for germination. Continually sprinkle water on the seeds whenever the top of the soil mix appears dry. Make sure you don’t waterlog the pots so that the seeds do not rot. To make it easy to spray water on the seeds, use a hand sprayer.
Temperature conditions for growing tomato seeds in the nursery
Tomatoes are heat-loving and sun-seeking plants just like okra and watermelon plants.
These warm-season plants do not tolerate extreme cold weather or frost at all.
As a result, you must be careful of the time of planting the tomato seeds.
In most regions, the soil is not warm enough until April or May, but it depends on where you live.
Normally, the seeds will need at least 4 hours of direct sun each day, but preferably more.
You can place the pots by your window or even your balcony to receive the direct sunlight.
This is because the warmer the temperature, the faster tomato seeds will germinate.
Maintaining room temperature above 60ºF will get the job done.
In about 5-7 days the tomato seeds will start germinating.
Tomato Varieties
Types of tomato varieties for profitable tomato farming
There are many tomato varieties which you may choose from and they vary according to size.
The choice also depends on how you want to use this versatile fruit in the kitchen.
For example, Roma tomatoes are not very good when you eat them fresh, but are great for making sauces and ketchups.
Generally, you can categorize tomato varieties based on how they grow.
In this case, they are of two types;
Determinate tomatoes: These are tomato plants that grow to predetermined height. They produce tomatoes that are good choices for canning and sauce-making. Indeterminate tomatoes: This type of tomato increase in height throughout the growing season because the terminal of the stem continues to produce foliar growth rather than set flowers. This type of tomato plants will continually produce fruits throughout the season along the side shoots of the plant. Indeterminate tomatoes are the choice if you want to spread out the harvest over a longer period of time. Setting the growth habit of tomatoes aside, here are the different types of tomatoes.
1. Cherry tomatoes
Examples of cherry tomatoes include Sun Gold, Napa Grape and Pear Drops.
They are a very sweet tomato variety which you can eat fresh and are great for salads.
Because they produce small tomato fruits, these tomatoes species mature quicker
2. Sauce tomatoes.
Types of sauce tomatoes include Roma, Amish Paste and Big Mama.
These ones have a richer flavor and much lower water content than other varieties.
They’re the best tomato types for making spaghetti sauce.
Sauce tomatoes, especially Roma, is the most popular tomato species in Nigeria Markets.
Roma species are very unique because they have long shelf life.
This is because they have thick skins and are in low water content which enables it to last longer after harvest
3. Beefsteak tomatoes
Typical examples of beefsteak tomatoes include Mortgage Lifter, Cherokee Purple and Brandywine.
They have the biggest fruit and the greatest range of flavor and form.
This is the type that you normally slice for sandwiches or making caprese salad, though you can eat the best varieties like an apple.
The remaining steps will be highlighted in part 2 of this article……
Watermelon is very nutritious, and it is a popular fruit throughout the world. It is actually a very common and favorite food.
In a 100 grams serving, watermelon fruit supplies 125 kilojoules (30 kilocalories) of food energy and low amounts of essential nutrient. Only vitamin C is present in appreciable content at 10% of the daily value.
Watermelon fruit is about 91% water and around 6% sugar and low amount of fat. However, here we are shortly describing about the top advantages/benefits of consuming watermelons.
Watermelon is an excellent source of water, containing around 91% of water. This fruit will keep you hydrated. And staying hydrated will keep your body cool during high summers.
It will clean your body and keep your skin healthy. Watermelon is a juicy fruit, and it will help your kidneys convert L-citrulline (amino acid) into L-arginine (amino acid). These two amino acids have a tendency to protect you from diabetes.
Watermelon consists of mostly water, so it will give you a feeling of fullness and this will curb your appetite from snacking on your favorite food. Thus it can help you in weight loss.
Consuming watermelon is beneficial for preventing cardiovascular disease. This fruit is a good source of vitamin C. And vitamin C is responsible for reducing the effects of asthma and this could mean that you could be fighting some of the severe effects of asthma with just one cup of watermelon everyday.
Watermelon is known for reducing dental problems. And it is also good for your kidneys. Watermelon fights inflammation. You can can avoid heart disease, cancer and fibromyalgia if you consume watermelon regularly. Watermelon is good for nerve function. It is a rich source of potassium that can regulate nerve function.
Some compounds in watermelon, including cucurbitacin E and lycopene, have been studied for their potential to prevent cancer (though study results are mixed).
Watermelon juice has some potential as a recovery beverage after exercise. Citrulline may be partially responsible for its effect of easing muscle soreness. Regular consumption of watermelon is very good for your skin and hair. There are several nutrients in watermelon which will help keep your skin and hair healthy. Watermelon contains fiber and water. Both are very important for healthy digestion.
Ensure to consume Watermelon often to get the nutritional values it offers.
Watermelon farming is very common and popular throughout the world. It is actually a highly cultivated fruit worldwide. And the fruit has both high demand and price in the market in almost everywhere around the world.
The watermelon is actually a plant species in the family Cucurbitaceae, a vine-like flowering plant originally domesticated in Africa. It is the most common and highly cultivated fruit around the world, having more than a thousand varieties.
Watermelon is a scrambling and trailing vine. There is evidence from seeds in Pharaoh tombs of watermelon cultivation in Ancient Egypt.
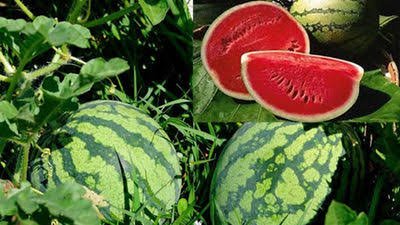
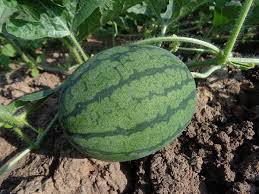
Watermelon plants grows well in favorable climates from tropical to temperate regions worldwide. It is grown for it’s large edible fruit, which is a berry with a hard rind and no internal divisions, and is botanically called pepo.
The sweet, juicy flesh is generally deep red to pink, with many black seeds. Although, today there are seedless varieties available.
The fruit can be eaten raw or pickled, and the rind is edible after cooking. It is commonly consumed as a juice or as an ingredient in mixed beverages.
Considerable breeding effort has developed disease-resistant varieties. Today, there are many cultivars are available that produce mature fruit within 100 days of planting.
Watermelons are plants grown in climates from tropical to temperate. They require temperatures higher than about 25 °C to thrive.
The seeds are generally sown in pots under cover and transplanted into well-drained sandy loam with a pH between 5.5 and 7, and medium levels of nitrogen.
China is the world’s largest producer of watermelon. And in the year of 2017, China produced about two-thirds of the world total watermelons.
Watermelon fruits
Advantages Of Watermelon Farming
Watermelon is very common and popular throughout the world. It is the most popular and highly cultivated fruit.
So, both demand and value are great in the market. You can easily start watermelon farming business if you want to make profits from agribusiness.
You can start commercial watermelon farming business, even if you are a beginner. Here we are shortly describing about the top advantages/benefits of watermelon farming.
√ Commercial watermelon farming is a very common and popular business idea, and many people are already doing this business. √ Growing the watermelon plants is relatively easy. So, you can take this opportunity for making good profits. √ Watermelon is a very popular fruit throughout the world. Both demand and price are high in the market. √ Watermelon plants can be grown in almost everywhere around the world. √ Commercial watermelon farming can be a good business idea, if you are an unemployed educated person. √ Commercial watermelon farming can be a great business for creating employment source for rural unemployed people. √ Profits are high in comparison to total expenditure. The ROI is good in this business. √ Watermelons have very good demand in the market. So, you will be able to easily sell your products in your local or any nearest market. √ Consuming watermelon regularly is good for health. You can enjoy fresh fruits if you start your own watermelon farming business.
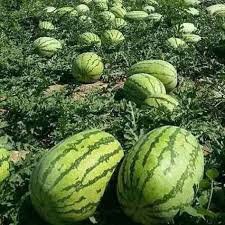
Watermelon Farm
How To Start Watermelon Farming Business
Starting commercial or small scale watermelon farming is very easy and simple. The plants grow well in almost everywhere and caring process is relatively easy.
You can start this business, even if you are a beginner. Here we are trying to describe more information about starting and operating successful watermelon farming business from planting, caring to marketing and harvesting.
Select Good Location
You have to select a very good location for starting your watermelon farming business. Watermelons grow well in rich, slightly sandy soils with pH levels from 5.5 and 7.0.
The watermelon plants do not like soggy soils. And avoid heavy clay soils with poor drainage and aeration system. Also ensure availability of full sun.
Prepare The Soil
Preparing the soil perfectly is very important for watermelon cultivation. Successful growing of watermelon plants require extensive soil preparation before planting.
The basic soil preparation starts about 5 months before transplanting watermelon seedlings. Plow the soil well at that time.
Plowing improves soil aeration and drainage. At the same time, plowing removes rocks and other undesirable materials from the soil. Till the soil perfectly, right after plowing.
Apply as much organic fertilizer as you can while preparing the soil before planting.
Climate Requirement For Watermelon Farming
Watermelon plants are grown in climates from tropical to temperate. They require temperatures higher than about 25 °C to thrive. Preferable temperature for growing watermelon plants is between 25 °C and 30 °C.
Best Time For Watermelon Farming
Watermelon plants can be grown throughout the year. Exact time vary depending on your location. In cool climates with short growing seasons, start seeds indoors 2 to 3 weeks before your last frost date. Plan to transplant seedlings into the garden about 2 weeks after that date.
In warmer climates with long growing seasons, sow seeds directly outdoors 1 to 2 weeks after your last frost date, as long as the soil temperature has warmed to at least 21 °C. Warmer soil helps prevent poor germination.
Watermelon Varieties
There are several, actually hundreds of watermelon varieties available throughout the world. Not all these varieties are good for commercial watermelon farming business. Try to determine which variety grows well in your area, and has good market demand. You can also consult with an expert in your area for having more ideas.
Purchase Seeds
The watermelon plants are grown from seeds. So, you have to purchase seeds from any of your nearest seed supply stores. Always try to purchase new and good quality seeds. Because good quality seeds always ensure good production. Today, there are some seed supply companies with online stores. So, you can also consider ordering the seeds online.
Seeds Per Acre
You will need about 1.5 to 2 kg of seeds for sowing one acre land.
Planting
Watermelon plants can be grown throughout the year. Exact time vary depending on your location. In cool climates with short growing seasons, start seeds indoors 2 to 3 weeks before your last frost date. Plan to transplant seedlings into the garden about 2 weeks after that date.
In warmer climates with long growing seasons, sow seeds directly outdoors 1 to 2 weeks after your last frost date, as long as the soil temperature has warmed to at least 21 °C. Warmer soil helps prevent poor germination.
Spacing: Actual spacing distance may vary depending upon sowing method. In pit method, use row to row spacing of 2-3.5 meters and 0.6 meters between 2 plants.
Sowing Depth: Plant the seeds about 2-3 cm deep.
Sowing Method: Different methods are used for sowing. Furrow method, pit method and hill method are most used. Although exact method depends upon climate and season.
Caring
Taking additional caring is very important for watermelon farming. Because the watermelon plants require good caring and other maintenance.
Although, all the caring process of watermelon plants is very easy. Here we are shortly describing about the caring process of watermelon plants.
Fertilizing
Apply as much organic materials as you can while preparing the soil. Watermelon plants love rich soil with lots of organic materials.
Apply Nitrogen@25kg, Phosphorus@16kg and Potash@15kg in form of Urea@55kg, Single Super Phosphate@100kg and Muriate of Potash@25kg per acre. Apply whole amount of Phosphorus, Potash and one third amount of Nitrogen before sowing seed. Apply remaining dose of Nitrogen near vines base, avoid touching it and mixed well in soil during initial growth period.
Irrigation
During the summer season, apply irrigation every week. And give irrigation only when needed during the time of maturity.
Avoid over flooding in watermelon field. Don’t wet the vines or vegetative parts of the plants while applying irrigation (especially during flowering and fruit-set).
Avoid frequent irrigation, in heavy soil, as it will promote excessive vegetative growth. Reduce or stop watering 3-6 days before harvesting for better sweetness and flavor.
Mulching
Mulching is very important for growing watermelon plants. Mulching helps to retain moisture into the soil and it also helps to prevent weeds. You can use organic materials (such as dry leaves, straw etc.) or polythene as a mulch.
Weed Control
Keeping the field weed free is very important for watermelon farming business. Weeds consume nutrients from the soil, and the plants will suffer.
Keep the bed weed free during the early stage of growth. In absence of proper control measures, weed can cause yield loss of about 30%.
Carry out intercultural operations, 15 to 20 days after sowing. 2-3 weeding are required depending upon severity and intensity of weeds.
Flowering & Fruiting
Vines produce both male and female flowers separately on the same plant. They often begin producing male flowers several weeks before the females appear.
Don’t be concerned if the male flowers fall off. The female flowers will stay on the vine and bear fruit.
Blossoms require pollination to set fruit, so be kind to the bees. As the fruit is ripening, prevent rotting by gently lifting it and putting cardboard or straw between the fruit and the soil.
Pruning
Pruning generally isn’t necessary for watermelon plants. But vine productivity may be improved if you do not allow lateral vines to grow and stick to the main vine.
Pests & Diseases
The watermelon plants are susceptible to some diseases and pests. Here we are shortly describing about some common diseases and pests of watermelon plants.
Pests
Common pests that damage the watermelon plants and fruits are listed below.
Aphids & Thrips: These aphids and thrips suck the sap from the leaves. Resulting in yellowing and dropping of leaves. Thrips results in curling of leaves, and the leaves become cup shaped or curved upward.
Fruit Fly: It is a serious pest of the watermelon plants. Females lay eggs below epidermis of fruits. Later on maggots feed on pulp afterward fruits starts rotting.
You can control all these pests by applying both organic and chemical pesticides. Consult with an expert in your area.
Diseases
The watermelon plants are also susceptible to some diseases. Their common diseases are listed below.
Powdery Mildew: Patchy, white powdery growth appears on upper surface of the leaves. And also on the main stem of infected plant. It parasitizes the plant using it as a food source. In severe infestation it causes defoliation and premature fruit ripening.
Leaf Miner: Maggots of leaf miner feed on leaf and make serpentine mines into leaf. It affects the photosynthesis and fruit formation.
Sudden Wilt: It can affect crop at any stage. Plant get weak and give yellow appearance at initial stage. And in severe infestation complete wilting is observed.
You can apply both organic and chemical ways for controlling these diseases. Consult with an expert in your area.
Harvesting
If tendril near stem gets dried also whitish color of fruit which touch to ground get yellowish then assume that fruit is ready for harvesting.
On thumping melon if it sounds hollow (usually as a dull thump or thud) then it is ready for harvest and immature fruit sounds dense. Don’t pick immature fruits as they ripe only when attached to vine.
Immature fruit don’t have rich sugar content or color. To harvest ripe fruit, cut stem 1″ from fruit with a pair of sharp pruners or knife. Fruit can be stored in a cool humid environment.
Post-Harvesting Tasks
Grade the fruit on the basis of size of fruits. Watermelons can be stored for about 2 weeks at temperature of 15 °C. But remember, do not store watermelon with apples and banana as it developed off flavor along with softening of fruit.
Yield
Exact yield is not possible to tell, because it depends on various factors. On an average, you can expect 7 to 8 tons per acre.
Marketing
Marketing watermelon is very easy. You will probably be able to easily sell your products in the local market. Although, you should set your marketing strategies before starting this business.
These are the common ways and steps for starting and operating a successful watermelon farming business. Hope this guide has helped you!
WATERMELON FARMING Watermelon is regarded as a fruit as well as a vegetable which are usually eaten raw, it is also among the best fruits recommended for people that wish to lose weight.
Meanwhile, if done rationally and on a scalable basis- can be a good source of income. In a few words, most commercial watermelon growers start the crop from seeds (hybrids) in an indoor protected environment.
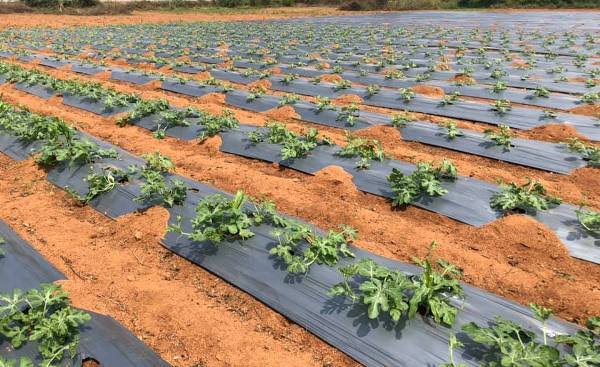
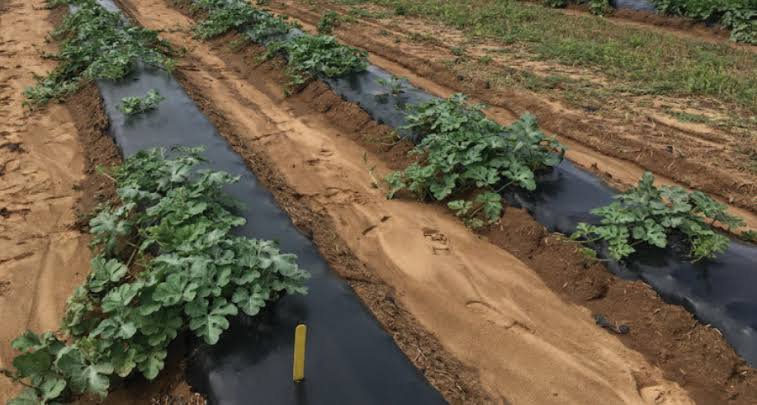
As they wait for the young seedlings to grow and be ready for transplanting, they prepare the field. They till the land, they make the beds or furrows and they place a black plastic film through the rows.
The black plastic film not only helps the soil become warmer but also controls weeds. They also design and place the drip irrigation system. When they are ready for transplanting, they make small holes in the plastic film, where they dig small holes and plant the seedlings.
Fertilization, Drip Irrigation and Weed Management is applied in most cases. Thinning is also applied. Commercial watermelon growers remove the malformed or underdeveloped watermelons in order to encourage the plant to devote its resources in fewer but bigger and tastier fruits.
Most commercial watermelon varieties can be harvested 78-90 days after transplanting. Harvesting can only be made through hand scissors or knives. After harvesting, watermelon growers plow and destroy the remaining of the crop.
They may also rotate the crop, in order to control diseases or prevent soil from depleting.
Now let us look at the 4 Reasons Why You Should Invest In Watermelon Farming Business below:
4 Reasons Why You Should Invest In Watermelon Farming Business
1)It gives a High Turnover on investment: It takes a watermelon approximately eighty five days to get to maturity from the planting date which means that you can have three sets of harvested watermelon fruits to sale within the year and if you started out the business on a large scale, then you are sure to get huge returns on your investment.
2) There is a Ready Market for your Produce: Aside from watermelon being a fruit recommended for people that wish to lose weight, it also contains some enzymes that help to fight against cancer causing cells in the body; you see why there will always be a high demand for watermelon.
3) Watermelon is Pest Resistant: This means that watermelon plant is resistant to pests and diseases that usually affect plants; you will not need to spend much on greeting ride of pests from affecting the watermelon.
5) It is very Easy to Start: As long as you have the land space needed for the farming, you don’t need much of other things to get your watermelon business up and running; you don’t need much technical knowledge to run a watermelon farm.
3 Things You Need to Start a Watermelon Farming Business 1) It Requires a large Expanse of Land: Each watermelon plant is called a vine; and the vines get to spread out as they mature and they need space for the plant to bear bigger fruits. I will talk more on the space needed for a watermelon plant to grow well.
2) It requires Sunlight: A watermelon plant requires a lot of sunlight to grow well therefore the land space must be in a location where there is adequate sunlight to nurture the plants.
3) Good Seedling: The type of seedling you use will affect the output or quality of watermelon fruits your plants will yield. There are various varieties of watermelon species, you have to make a choice of which variety you wish and carry out further research on how to handle the cultivation process before you embarked on it.
Snail farming in Nigeria is one of the most lucrative agricultural business ideas for young entrepreneurs in Nigeria. Snail farming is a practical and viable business venture that is yet to be fully explored in Nigeria and the rest of Africa.
Snail farming may not be the first thing that jumps to mind when thinking of profitable businesses to start in Nigeria. This post will open your eyes to the amount of hidden-wealth that can be realized by starting a snail farming business in Nigeria.
Why Snail Farming?
The market opportunity for snail farming in Nigeria and in Africa is huge but grossly underrated. Snails are a huge part of the diet in many parts of Africa, although they are not always affordable and available all year round. If you rear snail in commercial quantity, hotels, and fast food restaurants will be your regular customers.
In Nigeria, the prices of raw, matured snails go for N250 to N600 depending on the size. However, the annual demand for snail in Nigeria is about 7.5million kg annually. The international trade in snails is flourishing in Europe and North America. The United State America imports more than $4million worth of snails annually from all over the world, including Nigeria.
For many years now, snails handpicked from the farm or bush has been the only way to get snails to the market and dinner table. Currently, the demand for snail is higher than the supplies, an indication that the market potential of snail is inexhaustible, locally and internationally. Starting both small and large scale snail farming businesses is the only way to fill up the spaces between the demand for snail and its supply in Africa.
Below are the five basic steps you need to follow to start a profitable snail farming business in Nigeria.
Step 1 – Decide which species of snail to farm. When creating a snail farm, you’ll have to use a single species of snail. Research has shown that snail species such as Achatina. Achatina are the best for warm climate regions like Africa.
Step 2 – Set-up your farmland for housing. Your snail housing must have enough space for your snails to graze freely. Overcrowding your snailery impedes the development of snails and therefore should be avoided. A well-spaced snail housing reduces the risk of disease outbreak caused by overcrowding.
Snails are good at escaping from where they are kept, so you should endeavour to construct escape proof housing. You can use a pen house that will be spacious and accessible with a soil depth of 10 inches and trees around it.
Step 3 – Purchase your snails. If you want to start a snail farm, you’ll need to get snails. After setting-up proper housing and farmland for the snails, it’s time to buy some fresh quality snails from the market or any farm. It’s always best to be able to examine the snails before you buy them so that you know they are healthy.
When you first start your snail farm, you’ll want to get healthy, fully grown snails that will lay eggs and help populate your farm. Look at the shell of the snail. If there is a lip, that means they are a fully grown snail.
Step 4 – Feeding and rearing of the snails. Snails are vegetarians and can be fed with wide varieties of foods such as cabbage, cucumber, mango, banana, eggplant, pear, tomato and paw-paw, cassava, okra leaves or lettuce etc.
Mating and laying eggs are a vital part of snail farming. Typically, mating occurs during spring and summer. As hermaphrodites, snails can fertilize each other as soon as they are mature enough. In order for the egg laying to go over smoothly, you should use high-quality soil with the right temperature and humidity.
Step 5 – Harvesting and selling of the snails. It is not economically wise to harvest your snails before it’s maturity, it has to be mature before harvesting. Do not harvest all the matured snails at once to sell in the market. It is important to keep few for breeding and to serve as base stock for your snail farm.
Cost of Starting A Snail Farming Business
The mandatory expenses you need to account for if you’re wondering how to set up a snail farm include: housing, buying fresh snails, feeding, handling and processing the snails, marketing, and transportation.
You can start the business with N60,000 or N100,000 depending on how large you want your snail farm to be. Asides the amount of your investment, it is possible to produce 1,000,000 snails now worth more than N5 million twice a year.
This is made possible because of the availability of very highly prolific Achatina achatina species of snails, which lay 200 – 400 in one batch two-three times a year. If you produce 100,000 snails that sell for N250 each, which is N250 X 100,000, you will be making N2,500,000. You will be making N25,000,000 per annum or more than that if you produce 1,000,000 snails.
For beginners, creating a snail farming business plan is a crucial step that needs to be accomplished before starting. This will give you a deep understanding of everything that needs to be done.
Conclusion
In terms of cost and time, snail farming is a low-risk business. Unlike many other livestock businesses, snail farming requires very little startup and operating costs. You can even set up your snail farm at the backyard of your house to save cost on the purchase of farmland.
The best time to start up a snail farming is the rainy season especially from July to October because that is the time snails normally start to breed. You should also note that prices of snails multiply during scarcity between December and March, which is the dry season.